Text in outer area of an object Move the cursor near to object's outer area. Click on that area where you want text & start typing. Maintain the text orientation, distance & horizontal offset from property bar
Text in inner area of an object Move the cursor near to object's inner area.
Click on that area where you want text & start typing. It will create text frame automatic as shape of object.
Maintain the distance & other options from property bar.
See in property bar & give text orentaion, distance, horizontal offset. Below is property bar figure :-
If you don't have any video camera or web cam you can make vidoes without cam
CamStudio is able to record all screen and audio activity on your computer and create industry-standard AVI video files and using its built-in SWF Producer can turn those AVIs into lean, mean, bandwidth-friendly Streaming Flash videos (SWFs)
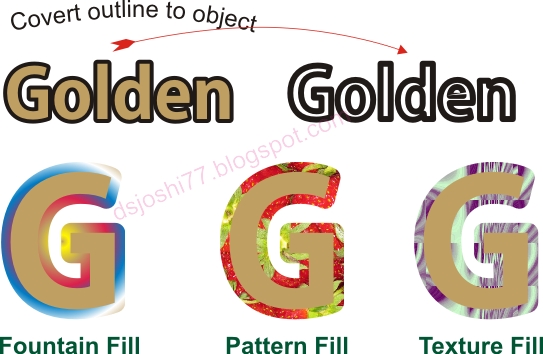
You want make your stroke stylish in coreldraw? today I'll tell you this trick. In this trick you can fill pattern, texture & fountain fill (vignette) in stroke of text & vector objects.
Follow the below steps : -
Make an object or type some text.
Fill in objects & give outline as you need.
Extract the outline using by Arrange / Convert Outline To Object or shortcut key Shift + Ctrl + Q.
Fill the color, pattern, texture, powerclip any vector or images, drop shadow & give outline again.
You can create your own arrowhead in coreldraw because it is very easy in Corel-X5. Create one object for starting arrow & second for ending arrow. When complete starting & ending objects select one by one & follow the below steps : -
(See this figure for better help)
Draw two objects. One for start arrow head & second for end arrow head (see above figure).
Create starthead object & flip it horizontal.
Create endhead object, don't filp this object.
Select start arrowhead object & choose menu Tools/Create/Arrowhead..... Give the name & click OK
Select end arrowhead object & do same procedure as you did for starting arrow object.
Now Draw a simple line & put the the arrow both side (see left figure).
Now pick shape tool or F10 key & select the rectangle box.
Select top right point & press + key from numeric keypad.
Select top left & top right point.
Press the Delete key.
You can pick any particular point (nodes) of top left, top right, bottom left & bottom right. & delete any point you get triangle. See above figure for better help.
Make The Accurate Triangle in the Corel-X3
Draw a straight line for base of triangle & give the size as you need.
Draw another straight line for height of triangle. Give the size & rotate it as you want angle it as 60 digree.
Select both line & press L & B keys for align it it as left, bottom.
Select both & press Ctrl + L for combine it
Select both points (nodes) by shape tool or press F10 key.
Press right mouse key & select join.
Select object & pick the freehand tool or F5 key & drag a line for complete this triangle.
You can now fill a color, texture, or power clip any image & objects on it. see the below figure
Round Corners Rectangle in CorelDRAW-X3 Draw a rectangle in coreldraw using by rectangle tool. Active PROPERTY BAR in your screen using by click right mouse key in menu area & choose PROPERTY BAR. Now select your rectange box & see the below area in property bar : -
You can make custom round corner using SHAPE TOOL (F10). Pick any node & move it where you want fix it. You can made round corner mention by numeric, just see in property bar & put numbers. If you want custom rounds just click in round corner together lock & put different different numbers for different corners. see below for some round corner in coreldraw : -
Round Corners Rectangle in CorelDRAW-X5
Three type of round corners in corel x5 which you can see in below figure & all function same as in corel X3 read the above paragraph
Perfect binding called side stitch also, you can make book with lot of pages. Their are many many kinds of perfect bound books.
See in left side figure you can understand it better
Perfect Bound Numbering
See the below figure which is 40 pages perfect bound numbering and 16 pages in one sheet included with front side & back side. Their are two front, two back & one is work & turn (front & back in one layout). You can make another pages books follow by below steps.
Saddle stitch called center pin also, this type booklets with few pages and it can maximum upto 80 pages. two pin in center with this book include with cover. this type books are secure for long time because it is stapled with a hard pin. It is very easy & quick way to make these types books.
Saddle Stitch Numbering
See the below figure which is 40 pages saddle stitch numbering and 16 pages in one sheet included with front side & back side. Their are two front, two back & one is work & turn (front & back in one layout). You can make another pages books follow by below steps.
You can make composite & separations print file in coreldraw. Their are lot of options for it. You can compress you file, crop mark in print file, increase fountain steps, over print black automatic etc. Just go to Filemenu & select Print or Ctrl+P.
General Tab
Select postscript printer. I am using Scitex Dolev800 PS L2.
If you have PPD than tick in PPD & select it for extra options otherwise leave it.
Go in Properties & click Advanced.
Choose paper size as you needed or click PostScript Custom Page Size.
Feed the width & height.
Select the Long Edge first for wide (Landscape) layout & Short Edge first for tall (Portrait) layout from Set Paper Feed Direction.
Layout Tab
As in document, fit to page, reposition image to & print tiled pages from image position & size
Custom bleed by tick to bleed limt
Choose imposition layout & edit it also
Separations Tab
Click in Separations tab.
If you want convert all colors in 4/c than tick in Convert spot colors to process, otherwise leave it.
Tick in Print Separations & choose different different options their. You can choose extra options tick by Use advanced settings (choose extra custom setting clicking by Advanced...)
Tick in Always overprint black for overprint black
If you want Ignore Preserve overprint if you overprint it into document than choose Ignore from Document overprints.
Prepress Tab
Invert (negative) & Mirror in / film settings.
Print file information, print page numbers & position within page in file information.
Crop / fold marks & exterior only in corp / fold marks.
Choose registration style tick by print registration marks.
Color calibration bar & densitometer scales in calibration bars.
PostScript Tab
Level 1, level 2 & PostScript 3 in compatibility.
Tick Use JPEG compression, maintain OPI links & resolve DCS links in bitmaps area.
Choose lpi (Line Per Inch) from screen frequency.
Download type 1 fonts & convert true type to type 1 in fonts area.
Choose full screen, Page only & Thumbnails choose in On start display & include hyperlinks, include bookmarks in PDF marks.
Choose maximum points per curve.
Choose set flatness to.
Tick other options are : increase flatness, auto increase fountain steps & optimize fountain fills.
WINDOWS FONTS FOLDER Their are manymany way for intsall fonts in window. We can install it from C:\WINDOWS\Fonts & go into file menu & choose Install New Font.... Select locaion & choose items & install it into your windows. You can copy items from folders & paste into windows fonts folder.
Adobe Type Manager Deluxe
I like ATM (Adobe Type Manager Deluxe). Because it is very convenience & easy to handlinlg it. you can make groups (Folders), active & deactive fonts wiht folders & particular fonts.
Fonts Navigator (CorelDRAW' Folder)
You can install in another ways. Just go into All Programs / CorelDRAW’s Folder / Bitstream Font Navigatior. Choose the folder where you store your fonts & select entire & particualar font from folder. you can install it by drag & press by INSERT key
See the below video for corelDRAW font navigator : -
Monochrome called black & white or 1 bit color image. Their are two types mode for convert color image into Greyscale and Black & White. But I am telling you about black & white mode & their kinds. here are the conversion method : Line Art, ordered, jarvis, stucki, floyd-steinberg, halftone & cardinality-distribution.
Select a bitmap & go to Bitmaps / Mode / Black & White (1-bit)...
See below figure for different type of modes.
To color a 1 bit image (monochrome) bitmap
Select a bitmap use of Pick tool.
Right-click a color on the color palette to change the color of the foreground.
Click a color on the color palette to change the color of the background.
You can create calendar quickly in coreldaw. Their are lot of options for it, you can make calender attractive, custom sizes, vertically & horizontally, different fonts, moon phases etc.
Menu : Tools / Visual Basic / Play...
Browse the Macros in.
Select CalendarWizard (CalendarWizard.gms).
Press the Run. (See the below figure...)
Make here particular and all months & year's calendars
Select Year.
Click in All for all months & tick in month for selected months.
Change & new language from Calendar Language.
Choose starting day from Week starts on.
Insert holidays in calendar click in Holidays & add all holyday's their.
Trun off tick from Create Calendar in Current Document for enable custum size. you can make it two type as portrait & landscape style.Set the margings for left, top, right & bottom from margins area & change scale by units.
Large : Header
there parts of large header as title, header & header highlights. see the below figure for help
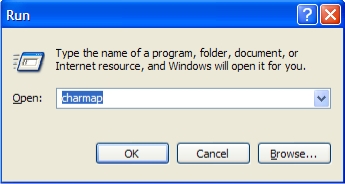
If you don't know how to type special fonts like : -Hindi, Punjabi, Gujarati & another language ( Indian & International ). I want tell you easy step for it.
If don't have font installed in computer, install it first
Go in START menu & select RUN.
Type charmap & press enter or OK button.
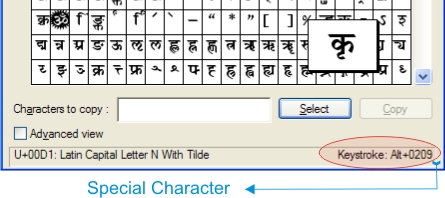
Choose fonts from List.
Define character in dialog box & click it.
Note the keyword in your mind. Go into document & press that key you define from character map. Or, choose character single or group. Click in Select... key & Copy it & paste into document. ( See below figure ).
Choose spacial character & note key like as in below figure Alt + 0209.
Press the Alt key & type numeric numbers 0209 & leave Alt key now.
What is Character Map ?
You can use Character Map to view the characters that are available in a selected font. Character Map displays the following character sets: Windows, DOS, and Unicode.
You can copy individual characters or a group of characters to the Clipboard and paste them into any program that can display them. Or, depending on the program you are using (such as WordPad), you can even copy characters by dragging them from Character Map directly into an open document.
Using Character Map, you can search for characters by Unicode character name or Unicode subgroup (such as arrows or mathematical operators) or by other special classifications.
You can also use Character Map to view and copy private characters that you have created using Private Character Editor.
If you know the Unicode equivalent of the character you want to insert, you can also insert a special character directly into a document without using Character Map. To do so, open the document and position the insertion point where you want the special character to appear. Then, with NUM LOCK on, hold down the ALT key while using the number pad keys to type the Unicode character value.
Whenever you want to add marks on the press sheet you must specify the text that you wanted to printout.There are special codes that can convert information of the job, template or the part of the job that needed to be automatically print.This types of codes called variables since the information sends from one sheet to another media.All variables must start with $ and no case sensitive.
Go to menu : Job / Job Information & set Customer, Job Title & Job ID. Put code in templete
Set Customer Name, Job Title & Job ID
Some preps's variables codes given in below : -
$customer : The customer ID number specified in the Job Information dialog box.
$job_title : The job title.
$jobid : The job ID number specified in the Job Information dialog box.
$jobname : This code for filename.
$sig : The number of the current job signature.
$side : The press sheet side (A = Front Side & B = Back Side). For multi-web signatures, additional sides are labeled C, D etc.
$time : The time the job was printed.
$jobdate : The date the Preps job was last saved.
$date : The date the job was printed.
$color : The color name for the current separation as : Process Cyan, Magenta, Yellow, Black & Pan-tone Colors.
$web : The web number of the press sheet
$comment : Set the text in the comment box in the print dialog box. You can set it while you print it in print dialog box. See the below figure : -
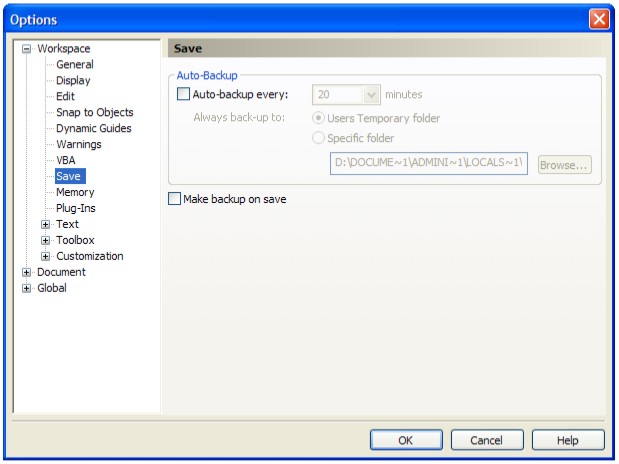
Corel files are heavy by including lot of pages, images & effects so we can not work quickly that time if auto backup is on in coreldraw. This option will make backup of you file every time by as set in default. If you don't want spend your working time you can off or increase that time by changing it from preferences.
Command : -
Tools / Options... shortcut key Ctrl + J
Set your options & click OK button
If you want permanent this settings you need another setting in this dialog box. Click in Document in preferences dialog box & click Save options as defaults for new documents. See below figure......
See all pages & group it pagewise or you can powerclip it.
Just see below figure
Bring all pages in pasteboard
Power clip in print size rectangle box
If PowerClip is not enable you can ungroup object & select object drage by mouse
Edit PowerClip & grow extra bleed under powerclip & finish powerclip
Set page size in which paper size you want print. As i using 18 x 12". Drage guideline vertical & horizontal, select guideline & press ( p ) for center to page. See below figure.
Arrange page squance as you need (Front & Back, Work & Turn & Work & Tumble).
Cutmarks in layout
Set Nude Offset 0.25"
Press key F5 (Freehand tool) & draw a line
Give size (0.125") & set outline color C=100, M=100, Yellow=100 & Black=100.
Select cut line & select top first object & press T & L (top align & left align)
Now select cut line & press once top arrow key for mark position.
Now press + key from numeric keypad for duplicate
select duplicate cutmark & top IInd object together & press L for left align
Do it till last
Open extra bleed in layout
Ungroup all objects
select those object which pages you poweclip & pres Ctrl + Q for curve rectange.
Press F10 key & select left side's point & press Left Arrow key.
Do same in all side & bleed will open which in extra powerclip.
Place registration mark & CMYK mark in vertical center in both side (Left & Right) for printing alignment as given in below : -
Click in image for large view
Shortcut keys : Center to page ( p ), Left in object ( L ), Right in object ( R ), Top in object ( T ), Bottom in object ( b ).
Note :
Group object first.
First select which object u want align & than select another object that alignment you want.
 Move the cursor near to object's outer area. Click on that area where you want text & start typing. Maintain the text orientation, distance & horizontal offset from property bar
 Click on that area where you want text & start typing. It will create text frame automatic as shape of object.