Thursday 31 March 2011

Auto Backup in Coreldraw

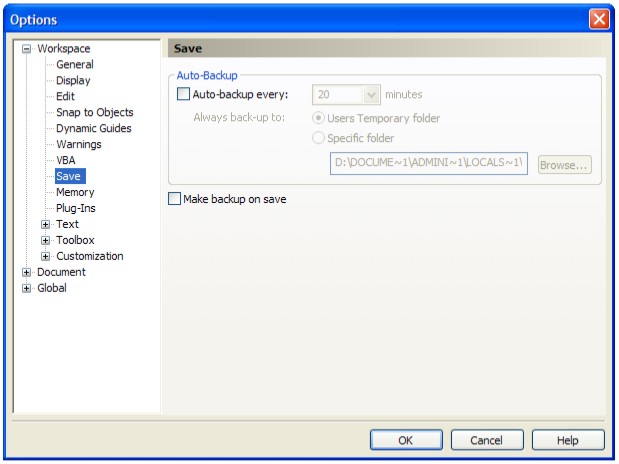
Corel files are heavy by including lot of  pages, images & effects so we can not work quickly that time if auto backup is on in coreldraw. This option will make backup of you file every time by as set in default. If you don't want spend your working time you can off or increase that time by changing it from preferences.

Command : -

Tools / Options...  shortcut key Ctrl + J

Set your options & click OK button


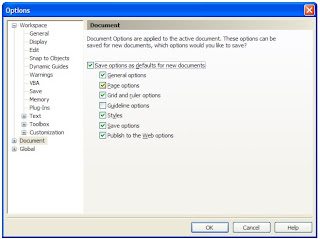
If you want permanent this settings you need another setting in this dialog box. Click in Document in preferences dialog box & click Save options as defaults for new documents. See below figure......


Tuesday 29 March 2011

Import eps, ps & prn File in Coreldraw


  • Go to File and choose Import or Ctrl + I
  • Browser the folder
  • Choose EPS, PS, PRN - PostScript from Files of type
  • Select File & click Import button
  • Choose optons Import as editable or Place as encapsulated PostScript


Directly copy from folder see below step :


  • You can copy from explore directly. Just go in folder where is your file
  • Select file & copy it by Ctrl + C
  • Go back into coreldraw & paste here it by Ctrl + V
  • Choose your option as given above 3 digrams

Tuesday 22 March 2011

Pasting, Cut marks, Registraion Marks & Color Name in CorelDRAW

Easy & fast pasting in coreldraw 

  • Open file & check RGB item & convert into CMYK.
  • Convert RGB black into CMYK black
  • See all pages & group it pagewise or you can powerclip it. 

Just see below figure


  • Bring all pages in pasteboard 
  • Power clip in print size rectangle box
  • If PowerClip is not enable you can ungroup object & select object drage by mouse
  • Edit PowerClip & grow extra bleed under powerclip & finish powerclip


Set page size in which paper size you want print. As i using 18 x 12". Drage guideline vertical & horizontal, select guideline & press ( p ) for center to page. See below figure.


Arrange  page squance as you need (Front & Back, Work & Turn & Work & Tumble).

Cutmarks in layout

  • Set Nude Offset 0.25" 
  • Press key F5 (Freehand tool) & draw a line 
  • Give size (0.125") & set outline color C=100, M=100, Yellow=100 & Black=100. 
  • Select cut line & select top first object & press T & L (top align & left align)
  • Now select cut line & press once top arrow key for mark position.
  • Now press + key from numeric keypad for duplicate
  • select duplicate cutmark & top IInd object together & press L for left align
  • Do it till last

Open extra bleed in layout

  • Ungroup all objects
  • select those object which pages you poweclip & pres Ctrl + Q for curve rectange.
  • Press F10 key & select left side's point & press Left Arrow key.
  • Do same in all side & bleed will open which in extra powerclip.


Place registration mark & CMYK mark in vertical center in both side (Left & Right) for printing alignment as given in below : -
Click in image for large view


Shortcut keys : Center to page ( p ), Left in object ( L ), Right in object ( R ), Top in object ( T ), Bottom in object ( b ).

Note :
  1. Group object first. 
  2. First select which object u want align & than select another object that alignment you want.


Friday 18 March 2011

Bevel and Emboss effect in CorelDRAW - Text & Graphics

Make your object & text attractive by embossing & bevel effect.  We can Bevel and Emboss effect in CorelDRAW, just following below direction :-

Menu : Window / Dockers / Bevel
          
  1. Select your object (Graphics & Text).
  2. Choose Soft edge from Style & give distance.
  3. Choose Soft edge from Style & click To Center.
  4. If you want outline click in object with Alt + Left Mouse Key & give outline.
  5. Choose Emboss from Style & give distance (background color & object color be same for emboss).
  6. Given Outline & change fonts click in object by Alt + left mouse key.
See below figure given with numbers as above text


You can change color by select object & click in color plate.
Break object by click right mouse key or Ctrl + K.
Change text from font list.

Use of Clone Stamp Tool in Photoshop CS5

The clone stamp is great tool for retouching in image in photoshop. I'll tell you how we can use it. 

  • Click in clone stamp tool from tool bar or you can pick this tool by ( c ) letter from keyboard.
  • Pick area where from you want starting clone by Alt + Left Mouse Key.
  • You can change brush size any time in working period by use : - to large brush by ] & small brush by [ .
  • Brush in particular area where you need use of it.
  • Clone Stamp Property in Toolbar

  • Use different effect while you clone in image from toolbar, see above figure.


Thursday 17 March 2011

Make Path & Remove / Change Background from images in photoshop CS5

Making Path, Remove & Change background in Photoshop CS5

  • You can choose pen tool from tool box otherwise press only p from keyboard button.
  • Click on path (see 2 number in below figure).


  • Make path from start point till to end point (path will be start and end in beginning point.
  • You can make path and modify it together 
  • You can use single undo by Ctrl + Z,  multiple undo by Ctrl + Alt + Z & custom undo/redo from Window / History.
  • Click in end point to continue this path.
  • When finish path go to & save path.Window / Paths
  • Double click in Work Path, give name & save it by OK button.

Path options in photoshop

Press Ctrl key & click in path together for make selection or select path and click in make selection path as given indication in above figure. Now your path in make it selction, you can copy image & paste in new layer or new document & put background image in back layer. Otherwise you make selection it & select it inverse & delete extra image by delete key

Wednesday 16 March 2011

Change barcode font in coreldraw X5

If your coraldraw is not enable fonts in barcode wizard you can do i manually than.


  • Select bardoce & Copy it.
  • Go to Edit click Paste Special.
  • Select Picture (Metafile).
  • Click OK.


  • Ungroup object.
  • Now you can change every part of it like : thikness, color & font.
  • Select text drag by mouse & change font from fonts list.
  • Don't forget Change RGB color to cmyk.